Cropping And Bleed
Standard Size Projects and Minibook Size Projects
Cropping and Bleed
Cropping and Bleed

When creating your page layouts it is very important to understand trim as a standard part of printing, and how to account for that trim. Properly placed pages will let your beautiful work shine!
Top Trim Tips
Whip your work into tip-top shape!
 Different Sizes
Books are considered either Standard or Mini. Standard books are sizes above 6x9, while Mini books are anything below that.
 Cover Crops
While hard and softcovers are both awesome, each has their own crop and bleed requirements. Keep this in mind when designing!
 Let It Show
All vital content (i.e. marriage proposals) should be kept within the crop guides with all non-vital content fully extended to the edge of the page.
 Safety Margins
Our crop guides make sure your vital content is safe by showing you where the trim will fall. When you ignore them, it makes your content sad (and disappear).
 Bulk orders
For bulk orders or important projects, we highly recommend ordering a proof so you can review the full book before continuing with the remaining order.
 Reassurance
It's always better to be safe than sorry! If you're unsure about something or just want a second set of eyes, email us or hop on live chat. We're happy to help!
Standard Books
Covers
After uploading your front, back, or full wrap covers, you’ll be shown a preview of the full cover including crop guides. These crop guides are:- The red crop guide indicates a .25" for softcovers. Softcovers have approximately 1/8” trimmed but cropping and bleed is recommended at .25" to account for shifting that can occur. Below is an example of a very happy softcover:
- The red and pink crop guides combined indicate the trim and fold guides for hardcovers. Hardcovers require a wider, roughly ½” bleed in addition to the .25", as the cover image is wrapped around a board (very similar to wrapping a present). We do recommend adding an additional .25" as a saftey measure, as content exactly .75” from the edge will be directly against the edge of the cover. This will make a total 1" margin for hardcovers. Take a look at this example:


Interiors
The automatic trim area for standard size interiors is approximately 1/8 inch on all sides, however we cannot guarantee any content that is within a full .25” from each edge of the page due to shifting that can occur in production. This is .25" is referred to as the "caution area" and represented by the red crop guide. It is something we are unable to change or adjust for a specific book as trim occurs during manufacturing to give your book a polished, finished look. In order to produce the best results possible, all vital content should be kept within the caution area with all non-vital content fully extended to the edge of the page. This ensures that no vital content is trimmed and there is no unwanted solid border remaining around the page. The tree below demonstrates this perfectly:
Heed this warning from Hamlet: while your book has only 1/8” guaranteed to be trimmed, the additional 1/8” is included for trim that may occur due to shifting during production (1/8”+1/8” = .25”). Because of this, we can’t guarantee any content falling within the Red Crop Guide (.25”) TO BE or NOT TO BE trimmed. Imagine Hamlet's skull friend - you want him all the way in the red and pink lines or he’ll start angrily waxing poetic. And believe us, no one wants waxy poetry.
Mini Books
Mini books are, of course, quite small and their creation should be treated much like a child should: very gently, lovingly, and with kid gloves. Ok, maybe that last bit only applies to the books. Because of their small size, these books have a more aggressive crop guide (for both the covers and interior as they are only available in softcover) so you’ll need to take note of both the red and pink guides. This is to help you make sure your content is fully within the safe zone! The pretty kitty below gives a great example of trim that occurs on the cover and interior of mini books:

Two-Page Spreads
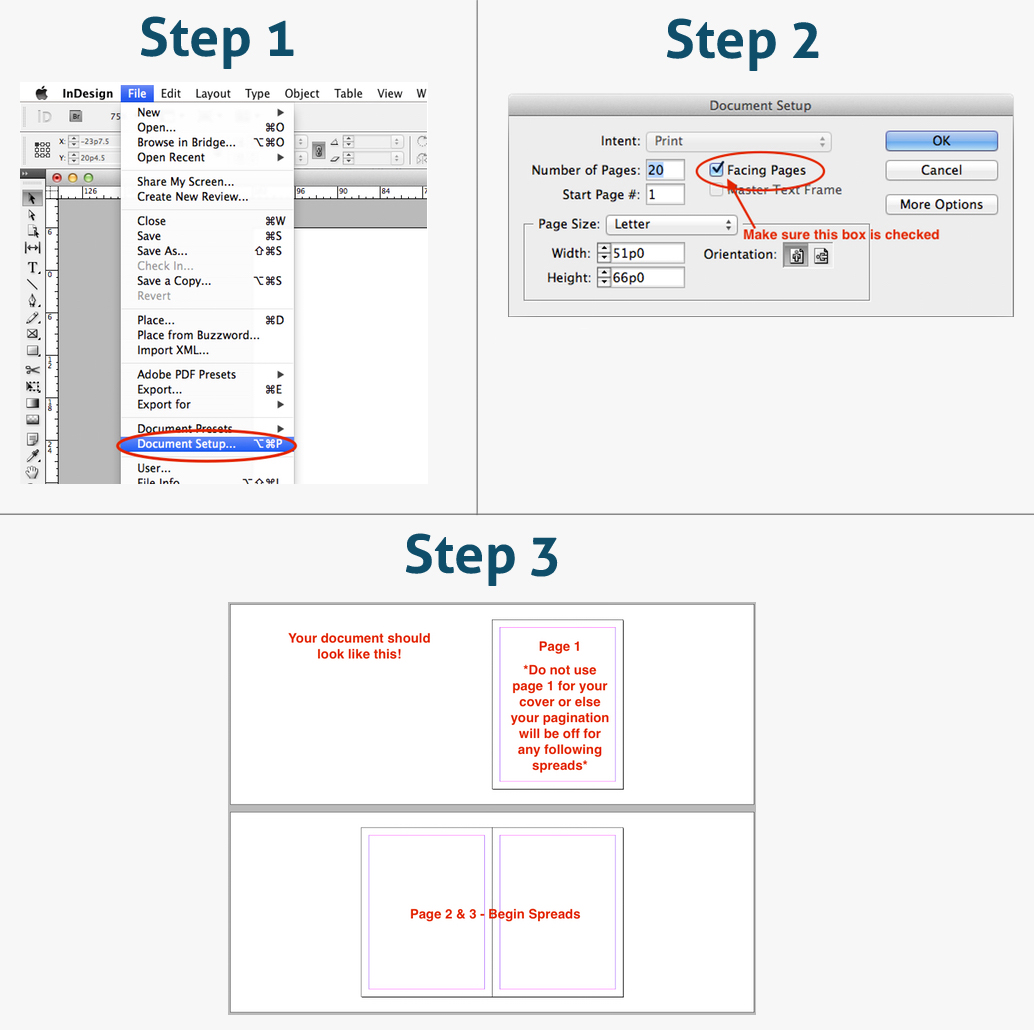
Sometimes your photos need a little more showcasing! If you want a continuous image to cross two pages, you don't need to make your image larger. Simply overlap 1/4" in the page gutter of each image for a pleasing, seamless result. Also, make sure that your spreads begin on an even numbered page (IE a spread going across page 2 & 3). Because our pages begin on the right hand side, if the spreads begin on an odd numbered page, then they be split up incorrectly! Usually it's as easy as adding a blank page to start, but check out this screenshot for a visual explanation. With the help of a fabulous wedding photographer and member, Edna Licia Henriquez, you can see a quick overview below for making two-page spreads. We also have examples of two-page spreads here, thanks to the members that kindly passed on their knowledge!

One more VIPI (very important piece of information): Be sure that spreads are separated and not uploaded as one continuous spread since this will skew the size of the book and we would not be able to print your book. This means that you need to have individual pages, not spreads, being uploaded. During export just make sure that it will be saved out with all of the pages separated. You can certainly have 2 page spreads, just make sure that they are indeed two separate pages!
Please note: if an order is placed with the interior uploaded as two page spreads we will have to cancel the order. But don't lose hope! You can edit the file, upload it to the site, and place a new order. When a book is created with spreads instead of separate pages, the new file would roughly double your page count and also increase the price of the book, which is why a new order would be needed. If you're ever unsure about something, send us a quick note and we can double check before you place the order!
Print Design 101
The look of elements placed on your page is ultimately your aesthetic preference. Design for print encourages elements not to fall directly against the edge of the page - the eye tends to like a little room around the edges for the most part. Because of this, when designing it is beneficial to visualize where the trim will occur. An additional buffer will also help to keep all vital elements from butting up against or under that trim. In the design world the technical term for this is "trying to dig out of prison". Now that we've covered the basics, below is a quick 1-2 (no punches, please) on setting up your document to preserve your vital content.
- Book Designer: It's a piece of cake to check on your vital content when using the Book Designer to create! Simply review the pages to make sure that your vital elements are not pushed directly up against or under the crop guides. You can see this both in the design process and when checking out by clicking "Layout Preview".
- PDF: When designing a PDF you can set up a double guide on the pages. Size the document with an additional .25" above what size you want (IE: 9x7 would be sized at 9.25x7.25) to allow amount for the trim area. Set a .25" guide in from each edge and add another guide of .25", or whatever amount you choose, in from the first guide. Extend all non-vital content to the edge of the page to ensure there won't be an unwanted border if the trim is closer to 1/8". Then, make sure the vital content is fully within the guides to ensure they won't be trimmed if the trim ends up closer to .25".
Just the FAQs
You have a few different options when previewing, but we super duper recommend using the "Layout" preview. This preview shows the most accurate view of what your book will look like after printing when using the crop guides. You can find this on Step 3 of the PDF Uploader or after clicking "Buy Now" in the Book Designer. The button "Layout" will show under the front cover preview.
Just remember, pay attention to the crop guides for your size project. These are:
- Standard Books: note the red crop guide (sizes above 6x9)
- Mini Books: note both the red and pink crop guides (sizes under 6x9)
Golly, do we ever! We have a great page that includes all of our biggest tips for PDF creation. We also have a top-notch help page on creating in InDesign, Acrobat, and Photoshop. We not only have words, we also have some pretty helpful infographics. That’s right, photo illustrations.
Our recommended PDF creation software is Adobe Acrobat, Photoshop, or InDesign, as those programs are the most optimized for use in creating PDFs that are compatible for printing. Adobe offers a free PDF creator that allows you to create 5 free PDFs; we recommend your file be in its final form before you use one of the 5 conversions. You can find even more options at our PDF Creation Software page!
The best way to account for trim during production is to add an additional .25" margin around the page (1/8" guaraneed trim + 1/8" caution area). For example, this means:
- 8.5x11 becomes 8.75x11.25
- 11.8x5 becomes 11.25x8.75
- 10x10 becomes 10.25x10.25
- 5x5 becomes 5.25x5.25
You can see that with each of these sizes we added the additional .25" above the size we want. Within this .25" you'll want non-vital content extending to the edge of the page with all vital content safely within the caution area. This will lead to beautiful results!
Don't forget: mini books have a much more aggressive trim due to their small size, so any book smaller than 6x9 will need to have an additional .25" caution area when designing.
We recommend a margin of at least .25” around the page where no important content (such as faces or marriage proposals) reside to avoid them being trimmed in production. We've also got some tips on how to set that up in your document:
- Set bleed @ 1/8" symmetric all around
- Have Optional Marks offset 10 points
- All intended bleeding elements must extend beyond the document size by at least 1/4" total in all directions (1/8" on each side) but do not include any important elements such as text or faces.
Of course we do! There are some great tools and downloadable design guides for a few of our most popular sizes at our Book Cover Specifications page. Aptly named to tell you just what you need. :)
Uh oh, sounds like you selected the wrong ratio in the Designer or created your PDF in a different ratio than what you wanted. In this case you’ll need to go back to the drawing board (or PDF creation program) and change the size or ratio to fit what you want. If you have questions about what size or ratio you’ll need to make your project you can always email us or hop on Live Chat!
Definitely! Here is a glossary of the most common terms in our cropping and bleed page:
- Bleed: The bleed is the part on the side of a document that gives the printer a small amount of space to account for trim or movement of the paper.
- Bulk Order: an order of multiple books, typically 5 or more.
- Caution Area: The area within the crop guide designated for your size project where content is not guaranteed TO BE trimmed, or NOT TO BE trimmed
- Crop Guide: A Red/Light Pink/or Yellow guide located at the Previews, and the Designer. This colored guide is laid over the edges of the page in order to give you a visual reference of the caution area.
- Layout Preview: The preview of the Layout of your project available at Step 3 / Webstore Options page. This preview shows the most accurate view of the crop guides in relation to your project.
- Manufacturing: Physically printing and binding the book, calendar, or card. Production of the projects. These times precede shipping.
- Mini Book: Books sized smaller than 6x9.
- Non-Vital Content / Non-Vital Elements: Content/Elements that are intended to be trimmed or irrelevant if it is trimmed. (Ex: excess sky in an image, background pattern, solid color background on the page)
- Standard Size Book: Books sized 6x9 or larger.
- Trim / Trim Area: 1/8” of the page that will automatically be trimmed/cut off the page
- Vital content / Vital Elements: Content/Elements that cannot be trimmed at all, or it would ruin the page. (Ex: text, faces, etc.)
Comments
full bleed setup
Thanks.
Re: full bleed setup
For a Full Bleed image in a 11"x8.5" Book, we recommend looking at this help topic "How do I add bleed to my layouts?" for more information: https://www.prestophoto.com/help/Cropping+And+Bleed#headingFour
Warm Regards,
Tim
Full page spreads
Thank you
Re: Full page spreads
The overlap for 2-page spreads should only be .25". So setting those guides at .25" and 8.5" is correct (:
MJ
Book Size
Kristin
Page size and margins for minibooks
Re: Page size and margins for minibooks
Greetings from PrestoPhoto!
For a 5.25x3.5 you can create the page ideally at 5.5x3.75!
_
" When creating your interior pages, ideally each will be created with an extra 1/8" on each side. This will equal an additional 1/4" (.25”) total to the height and width of the project. (Example: A page created for a 9"x7" photo book ideally will be created at 9.25" x 7.25".)
Note - projects uploaded as a PDF or interior pages uploaded to a gallery are both accepted at exact trim size. (Example: a 9x7 can be accepted as a true 9x7 - it is ideal though to add the additional .25” to each trim size.)
_
Then from there you will simply need to make sure that all the backgrounds are extended to the edge of the very edge of the 5.5x3.75 page - and that all vital content is kept within 1/2 inch from that outside edge.
Best,
PrestoPhoto support
support@prestophoto.com
Preview crop guides vs. specification crop guides
Please comment
Thank you,
Yury
Re: Preview crop guides vs. specification crop guides
Greetings from PrestoPhoto!
Here is a great screencast that will explain all of our crop-guides: http://www.youtube.com/watch?v=E8Ksz1k8Djs&feature=mfu_in_order&list=UL
You can view your project in reference to the crop guides most accurately at the Layout Preview in Step 3:
For the Layout Preview:
(The crop guides are able to be viewed or removed by simply clicking or un-clicking the "Show Crop Guides" at the top left of the preview.)
The Red crop guide is for standard size projects (9x7 or larger)
The Pink crop guide is for mini-books (anything smaller than a 9x7)
For the Flip Preview:
The Flip preview offers 1 single yellow crop guide that is both the Red and pink crop-guide combined, and is therefore more aggressive than necessary for standard size books. For most accurate crop guides when considering your work, please use the Layout Preview
There is an automatic trim that occurs during production to ensure that all pages are flush. This trim is approximately 1/8 inch on all sides. For standard-sized books (6x9 and larger) we suggest that all vital content is kept within .25" from all sides, and consider this the "Caution Area." We do not guarantee any content that falls underneath the Red crop guide (.25") / Caution area. You can learn more about this here: http://www.prestophoto.com/wiki/Cropping+And+Bleed
All non-vital/background content should be extended to the edge of each page. All vital content (text and faces) should be kept within the Red Crop-guide for all standard size books. The Pink Crop-guide is for mini-books (any book smaller than a 6x9) is more aggressive due to the the mini-books small size, and therefore requires a more aggressive crop-guide.
Best,
PrestoPhoto support
support@prestophoto.com
Inside Colour of the books